How to Wear a Wig With Long Hair: 5 Flat Methods, the Bulk Map and the Flatness Test
How to wear a wig with long hair starts with one honest fact: your length is not the problem, your bulk placement is. Hair spread flat sits invisibly; hair stacked in one spot lifts the whole wig.
The system on this page is the Bulk Map: distribute your hair, flatten it, then verify the result. Every method is judged by where its volume lands, never by popularity alone.
You keep every inch of your hair. No method here needs a cut, a shave or a sacrifice trim, whatever older advice may have implied to you.
This prep guide sits on ModernHairstyle beside the product pages. It owns only what goes under the wig, from the first braid to the final flatness check.
The Bulk Map: Why Length Is Not the Problem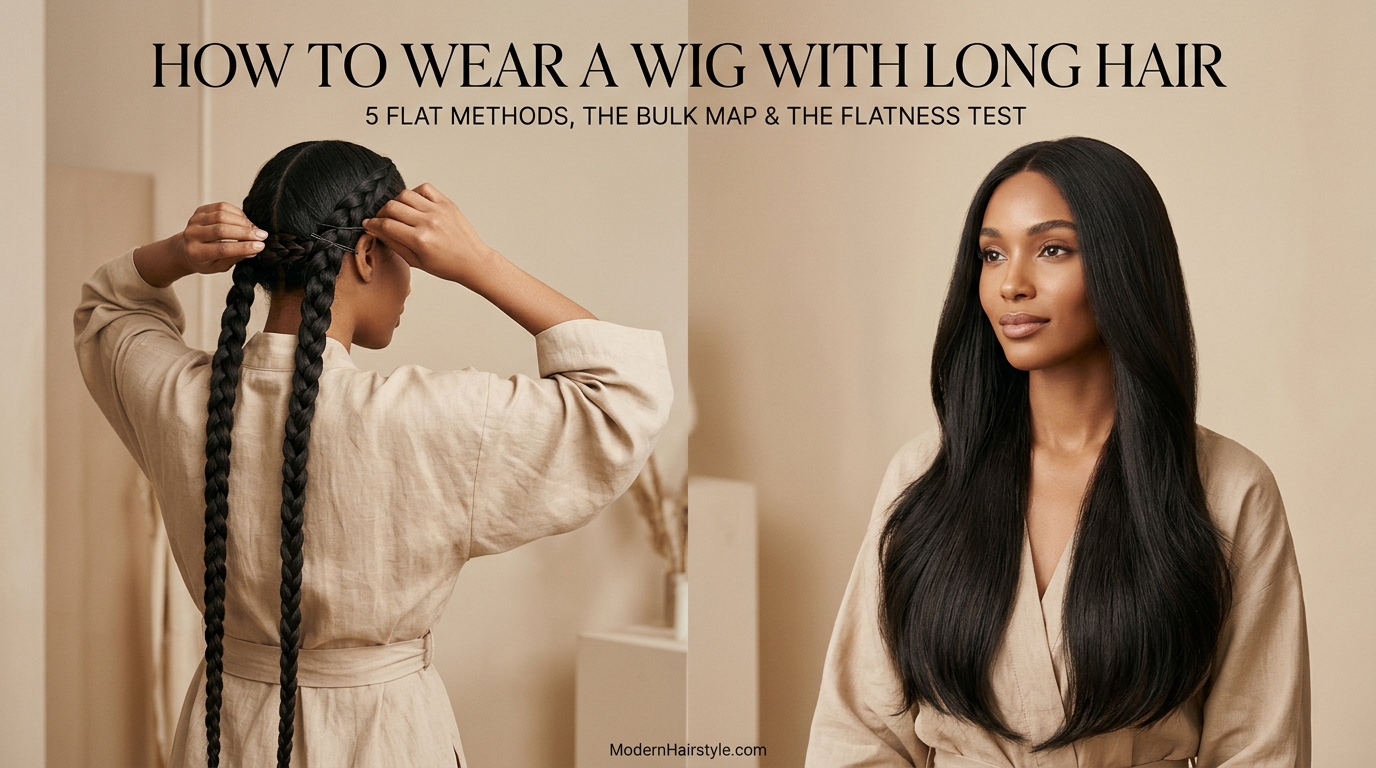
A waist length head of fine hair can pass under a wig more easily than shoulder length thick hair. The difference is distribution, because flatness comes from spreading volume, not from having less hair.
Think of your hair as a fixed amount of volume that must land somewhere. Each method simply chooses where that volume sleeps for the day, evenly or all in one mound.
The Three Bulk Zones
The crown zone is the top of your head. Bulk stacked there raises the whole silhouette, making the wig sit high and look taller than your real head ever did.
The perimeter zone runs around your hairline and edges. Loose strands, thick braid starts and folded cap edges push the lace and rim outward here, showing the join.
The nape zone sits at the back of your neck. Unpinned braid tails collect there, so the wig rides up at the back and tilts whenever you lean your head back.
Distribute, Flatten, Verify
First, distribute: pick a method from the chooser below that spreads your hair across zones. Stacking is the enemy, and every method section names where its bulk lands.
Second, flatten: work each method close to the scalp, cross the tails at the nape, and pin them in a flat circle or path. Third, verify with the Flatness Test before styling.
Before You Start: Tools, Clean Hair and Time
Your kit is small and cheap: a wide-tooth comb, a rat-tail comb, flat bobby pins, soft hair ties, sectioning clips, a satin scarf, and your cap or grip.
Add a hand mirror for the nape check and a spray bottle if your hair braids better slightly damp. Keep extra pins within reach, because dropped pins mid-install slow everything down.
Prepare Your Hair Properly
Start with hair that is clean and fully dry. Damp hair under a cap is linked in competitor guidance to mildew and irritation risk, so treat dry hair as a hard rule, not a preference.
Detangle gently from the ends upward, then moisturize lightly, especially coily hair. Heavy product builds up under a cap, so use gel or mousse sparingly, only on flyaways and edges.
Set a realistic clock for your first attempt. A competitor strand from a glueless fitting guide puts a first install at 20 to 30 minutes, and cornrows or pin curls take longer.
The Method Chooser: Your Hair, Your Target Wig
Do not pick a method because a video made it look easy. Pick it by three facts: your length, your thickness, and the length of the wig going on top.
The target wig matters as much as your own hair. A long wig forgives a small bump under its own volume; a short wig or bob forgives nothing at all.
|
Your hair |
Long or mid-length target wig |
Short wig or bob target wig |
|---|---|---|
|
Fine, shoulder length |
Two wrapped braids, or a folded low ponytail |
Two wrapped braids, kept very flat |
|
Fine, mid-back |
Two wrapped braids crossed at the nape |
Pin curls, or two very flat braids |
|
Fine, waist and beyond |
Two or four braids wrapped in a flat circle |
Pin curls, the flattest option |
|
Medium, shoulder length |
Two wrapped braids or flat twists |
Two flat braids; never a bun |
|
Medium, mid-back |
Four flat braids or cornrows straight back |
Cornrows or pin curls |
|
Medium, waist and beyond |
Cornrows, or four braids with tails distributed |
Cornrows in the flattest rows |
|
Thick or coily, shoulder length |
Cornrows or flat twists, moisturized first |
Cornrows; avoid raised Dutch braids |
|
Thick or coily, mid-back |
Cornrows straight back, tails pinned flat |
Cornrows; no room to hide bulk |
|
Thick or coily, waist and beyond |
Cornrows, tails wrapped and pinned in sections |
Cornrows plus a mesh cap; the hardest case |
The chooser logic extends the approach used by the Simply Wigs guide to wearing a wig with long hair, a UK retailer whose customers answer these questions daily. Its terms differ from US usage, flagged below.
The Hardest Case: A Short Wig Over Long Hair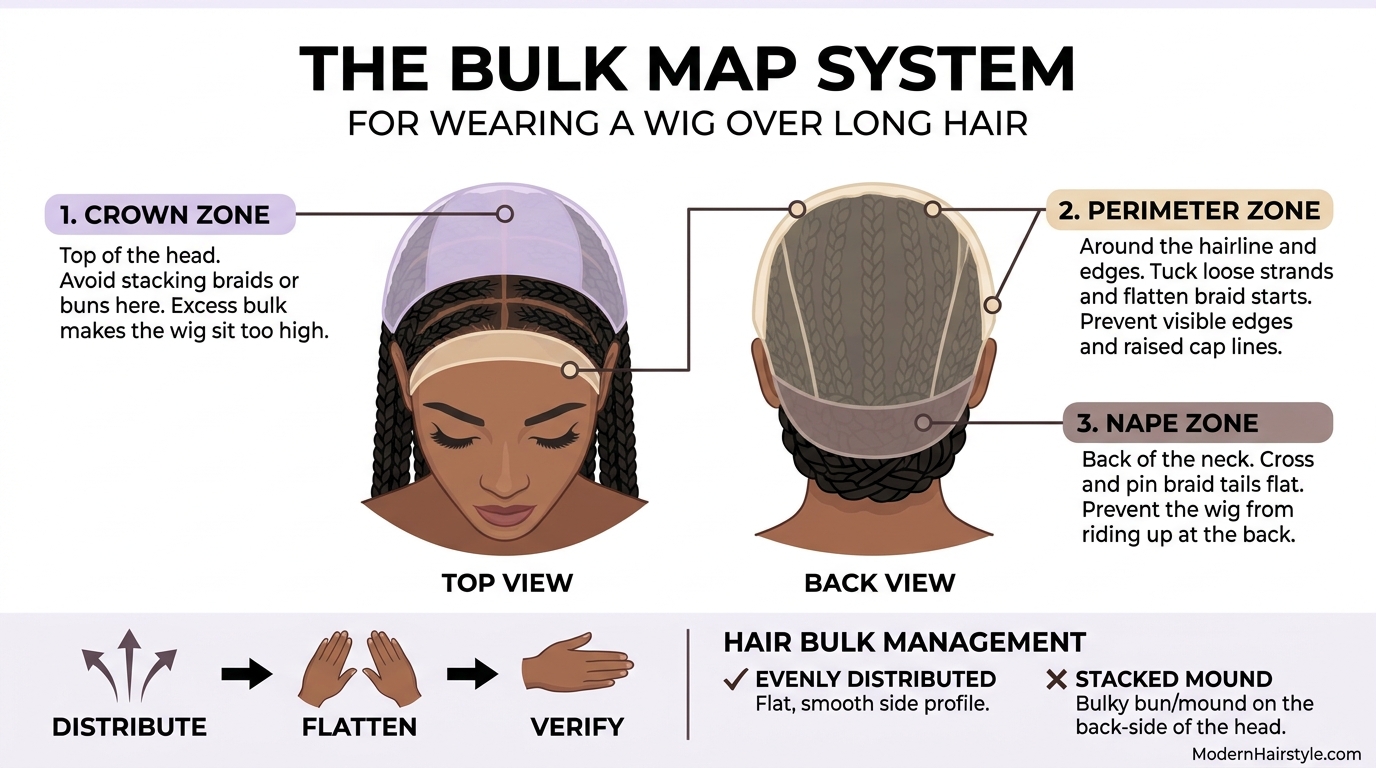
A short wig over long hair is the true difficulty setting of this whole topic. The wig has no length of its own to drape over a mistake, so every ridge prints through.
If that is your goal, the Short Hair Wig page owns the product side of that pairing. Your prep side is stricter: cornrows or pin curls, a mesh cap, and a flatness test passed twice.
Waist length hair under a bob is the extreme version of the same problem. Wrap tails in a flat circle, pin every tail, and check the nape zone twice, because that is where long tails hide.
Method 1: Two Wrapped Braids
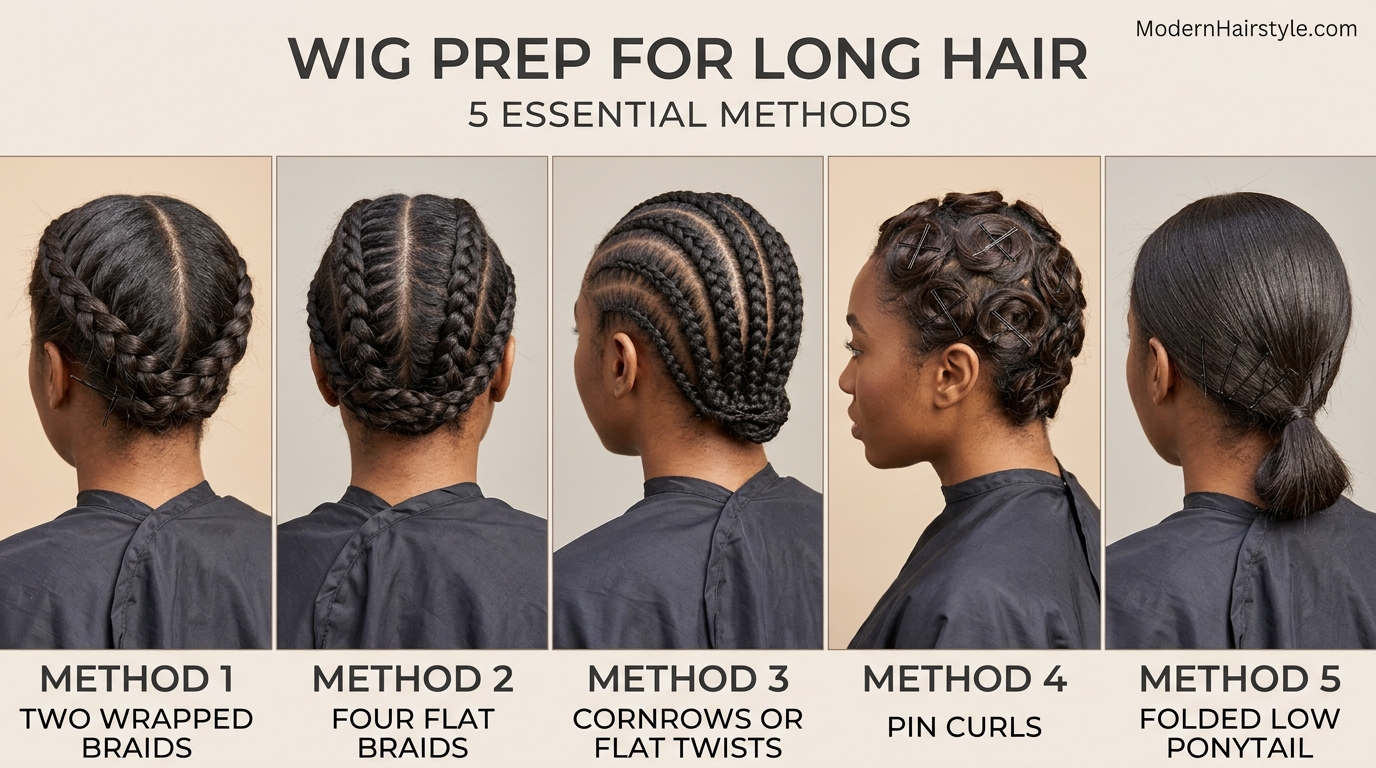
Two wrapped braids are the default method for most long hair. They are fast to learn, easy to undo, and they spread bulk around the head instead of stacking it on top.
This is also the route the UNice guide to wearing a wig with long hair teaches as its plait method, using the British word for braids. The steps below use US terms throughout.
Steps for Two Wrapped Braids
- Part your hair down the middle, from forehead to nape, and clip one side away. A clean center part keeps the two sides balanced, so neither side carries more bulk.
- Braid each side close to the scalp, working downward and keeping the braid snug, never tight. A standard three-strand or French braid both work; flatness matters more than style.
- Cross the two braids at the nape, bringing each tail up the opposite side of your head. Crossing low keeps the crown zone empty, which is exactly where height problems begin.
- Pin each tail flat in a circle, following the shape of your head. Use flat bobby pins, crossed in pairs, and keep pins away from the hairline so nothing pokes through lace.
- Tuck the ends under the opposite braid or pin them flat against it. Loose ends are the classic nape lump, so no tail should end in a bunch.
Finish with the satin scarf press: tie a scarf over the braids for 5 to 10 minutes. Competitor guidance credits this simple press with flattening flyaways before the cap goes on.
Method 2: Four Flat Braids for Thick Hair
Thick hair in two braids makes two thick ropes, and thick ropes print through a wig. Splitting the same hair into four braids halves each rope and doubles the distribution.
The braid count rule is a thickness rule, stated by several cap and wig retailers: two sections for most hair, four sections when hair is thick. It is not a skill test or a style choice.
Steps for Four Flat Braids
- Part your hair into four sections: two at the front and two at the back, split by a center part and an ear-to-ear part. Clip each section so the quarters stay separate.
- Braid each section flat against the scalp, keeping every braid the same tension. Uneven tension makes one thick braid that behaves exactly like the two-braid problem you were avoiding.
- Wrap the four tails in a flat path around the head, alternating sides. Alternate so that two tails never stack at the same point on the circle.
- Pin as you go, not at the end. Pinning each tail down before wrapping the next one keeps the whole arrangement low and even under your palm.
Method 3: Cornrows and Flat Twists Straight Back
Cornrows are the closest-to-the-scalp method most home wearers can achieve. Rows run straight back, so bulk spreads in thin parallel lines instead of ropes or mounds.
For thick, long or coily hair, this is usually the right answer rather than the advanced one. Flat twists give a similar straight-back map for hair that tangles under cornrow braiding.
Steps for Cornrows or Flat Twists
- Moisturize coily hair first, then detangle and part clean, straight rows with the rat-tail comb. Dry, unmoisturized hair breaks under row tension, so this step protects the hair you are keeping.
- Braid or twist each row straight back, close to the scalp, with even, snug tension. Keep every row the same height; one proud row becomes a visible ridge under a short wig.
- Keep the rows off your edges. Do not pull the hairline into the first row, because repeated tension at the perimeter is where traction stress shows up first over time.
- Pin the tails flat at the nape, crossed or laid side by side in a flat band. A thick knot of tails at the back undoes the rows’ flatness in a single spot.
The Kes Wigs beginner wig guide walks the same flatten, cap and position workflow for new wearers. Its value is the full sequence in one place, from prep to blending.
Method 4: Pin Curls, the Flattest Base
Pin curls are the theatre and cosplay answer, used where a wig must sit almost painted-on. Hair is wound into small flat curls and pinned close, leaving the lowest profile of any method here.
The trade is time and pins. A full head of pin curls takes longer than two braids, and the result depends on spacing the curls evenly rather than piling them at the crown.
Steps for Pin Curls
- Section your hair into small, even parts across the whole head. Small sections make flat curls; large sections make cushions that defeat the entire method.
- Wind each section into a flat curl against the scalp and pin it with two crossed flat pins. Keep every curl in its own space, never stacked on a neighbor.
- Avoid the crown pile-up. The natural instinct is to pin everything upward, which rebuilds the crown lump this method exists to prevent, so check the top with your palm as you go.
- Finish with a cap, not just pins. The cap smooths the pin field and stops pin ends catching the wig’s lining when you pull the wig on.
Method 5: Low Ponytail Folded, and the Low Bun Strand
A folded low ponytail is the quickest method on this page, and the most conditional. It can work for fine hair only, folded low and flat, and only when it passes the flatness test.
In thicker hair, the fold becomes a ready-made crown or nape mass. That is why the chooser routes medium and thick hair to braids and cornrows, never to a fold.
The Low Bun: Two Sources, Two Verdicts
This point is a labelled strand, because good sources disagree. The WigAnswers guide to putting on a wig with long hair recommends a flat low bun for hair past the shoulder blades, pinned tight at the nape.
Simply Wigs, by contrast, routes long hair to wrapped braids and warns that bun and ponytail shapes lump. Read both, then let your flatness test decide: fine hair may pass with a bun, most long hair will not.
Dutch Braids: a Method With a Warning
Dutch braids appear in some method lists, but they sit raised on top of the hair by design. That raised profile adds exactly the profile height this page is trying to remove.
If you love the style, wear it on no-wig days. Under a wig, choose French, standard or cornrow braiding instead, because those forms lie against the scalp rather than standing on it.
The Cap System: Nylon, Mesh, Dome or a Grip Band
The cap does three jobs: it contains every strand, smooths the braid map, and gives the wig a consistent surface to grip. Skipping containment is why loose hair escapes at the nape by midday.
|
Cap or alternative |
Best for |
Watch out for |
|---|---|---|
|
Nylon stocking cap |
A smooth finish over braids or twists |
Can slip, and can be harder to pull over long prepared hair |
|
Mesh or fishnet cap |
Long tails, cooler wear, very long hair |
Cooler but less smooth than nylon over a braid map |
|
Dome or stretch cap |
Thick or coily hair needing more room |
Stretch can hide a lump until the wig goes on |
|
Wig grip band, no cap |
Wearers who overheat in caps, or need grip security |
Does not contain loose strands the way a cap does |
Cap guidance collected in The Weave Assist wig cap guide adds the fishnet liner method used by Jon Renau: liner around the neck, hair crossed at the nape and pinned in a circle, then the liner brought up over it.
Match your cap color to your scalp or skin tone. A mismatched cap shows through a part or lace front as a visible line, undoing the natural finish you prepped for.
Cap or Grip Band: the Not-Both Rule
Most guides call a cap essential, and it stays the default on this page. Simply Wigs reports that many of its long-haired customers use a grip band instead, and that most use one or the other, not both.
A grip gives security without containment; a cap gives containment with mild grip. Thick hair usually needs containment first, so start with a cap, and try a grip only once your base is fully braided and controlled.
Putting the Cap On: Two Directions, Both in Use
Cap direction is another labelled strand. The Wigs.com liner method works nape to forehead; the Headcovers method works forehead to nape, and neither source treats the other as wrong.
Pick one direction and master it. What matters is the result: the cap edge lying flat, every strand tucked inside, and no rolled edge at the hairline or nape when you finish.
Cap Application Steps
- Stretch the cap open with both hands and set it using your chosen direction. Work slowly so the cap does not drag your braids out of their flat arrangement.
- Cover all of your hair, then tuck in every loose strand with your fingertips. Pay special attention to the hairline and nape, where escapes always start.
- Smooth the cap surface with your palm and reseat any folded edge flat. A folded cap edge becomes a perimeter ridge that the wig will faithfully display.
- Pin the cap only if needed, with flat pins at the temples. Most wearers need no pins once the cap fits, and extra pins add bumps of their own.
Measure Over Prep: Size the Wig to the Finished Base
Measure your head over the finished braids, never on a bare head. The wig must fit the head you actually present to it, and braided long hair adds real circumference.
A fitting strand from the glueless guide puts an average cap at 22 to 22.5 inches, about 56 to 57 centimeters. Treat that as a labelled strand, not a promise about your head or your prep.
If the Wig Feels Too Small Over Your Prep
Work the ladder in order. First, let the adjustable straps out fully, then tighten them gradually to snug after the wig is seated, the order Simply Wigs teaches its customers.
Second, try a stretch or mesh cap, which gives bulk more room than a firm nylon cap. Third, choose a larger cap size in the wig itself, rather than forcing a tight fit.
Never solve a sizing problem with tension. A cap or wig that feels tight at the hairline is a warning to change size, not an invitation to endure it for the photos.
If you prefer hands-on help, a fitting at a human hair wig store near you lets you test cap sizes over your own prep. Bring your braids done, so the fitting measures the real base, not a guess.
Put the Wig On Over Your Prepped Hair
With the base flat and capped, the wig itself goes on front to back. Hold it by the ear tabs, set the front at your natural hairline, then pull it down over the back.
Seat the ear tabs level on both sides, then settle the nape into place with a downward tug. Adjust the straps last, to snug, never tight, once the wig sits where it belongs.
A glueless wig suits this routine well, because its straps and band do the holding without adhesive. Its fit still depends on your prep, not on the label on the box.
Wig choice beyond prep lives on the product pages: the Long Hair Wig page owns lengths, density and product detail, and the Human Hair Wig page owns the wider category. This page deliberately stops at the base underneath.
For styles that change the prep slightly, note two live siblings. A human hair wig with bangs forgives more at the front hairline, while a real hair wig follows the same flat base rules as any full wig.
The Flatness Test: Verify Before You Style
Verification is the step no competitor teaches as a gate, and it is the cheapest fix on this page. Run all three checks before styling, while fixing your prep still costs two minutes.
The Three Checks
- Palm sweep test. Run a flat palm over your capped head in every direction. A pass feels like a smooth glide; any ridge or mound names its zone for you instantly.
- Cap smoothness test. Look at the cap in a mirror and feel its surface. If you can see the braid map as bumps through the cap, the wig will show it too.
- Wig sit test. Put the wig on and check three things: it sits at your natural hairline, the ear tabs lie flat, and the nape stays down when you nod and turn.
Lump Diagnosis: Read the Zone, Fix the Cause
When a check fails, diagnose before you change products. Almost every lump is a distribution problem with a prep fix, not a sign that you bought the wrong wig.
|
Lump location |
Likely cause |
Fix |
|---|---|---|
|
Crown |
Bun, folded ponytail or braids stacked at the top |
Rebraid into wrapped braids or cornrows; move the mass off the crown |
|
One side |
All braid tails pinned to the same side |
Cross tails at the nape and pin in a circle, or split tails to both sides |
|
Hairline and perimeter |
Loose strands, a thick braid start, or a folded cap edge |
Tuck every strand, flatten braid starts, reseat the cap edge flat |
|
Nape |
Unpinned tails collecting at the back |
Wrap tails flat along the nape and pin; try a mesh cap for very long tails |
|
All-over height |
Total volume exceeds the cap’s room |
Measure over prep, let straps out first, move to a larger or stretch cap |
Density can mask a small residual bump once distribution is right, because layered volume hides minor unevenness. Treat that as a finishing tactic only; density never substitutes for flat prep underneath.
Keeping Long Hair Healthy Under a Wig
This section is general information only, not medical advice. The habits below reflect standard stylist and competitor guidance for reducing friction, tension and buildup during regular wig wear.
Keep braids and cornrows snug, never tight. A headache, pulling or pain at the hairline is a signal to loosen or remove the style, not a normal cost of looking neat.
Repeated tight installs can stress the hairline over time, a risk stylists describe as traction risk. Rotating methods, easing tension at the edges and taking breaks between long wears all reduce that repeated stress.
Cap only clean, fully dry hair, and wash and dry your caps between installs. Moisturize coily hair before cornrows, keep parts clean, and let your hair rest unbraided regularly between wear days.
Troubleshooting: Slipping, Riding Up and Stray Hairs
If the wig slips backward, suspect the perimeter first: loose strands break the grip, and a cap that is too smooth or too loose cannot hold. Re-tuck, reseat, and consider the grip band after containment is fixed.
If the wig sits too high, suspect the crown, not the size chart. Flatten the crown zone, rerun the palm sweep, and only then revisit straps and cap size over your finished prep.
If hair pokes out at the nape, your tails are too loose or too long for that cap style. Repin the tails flat, switch to a mesh or fishnet cap, and recheck the nape after the wig sit test.
A note on terms for US readers: British sources say braids where they write plaits, and bobby pins where they write kirby grips. The methods transfer directly; only the vocabulary and any prices stay British.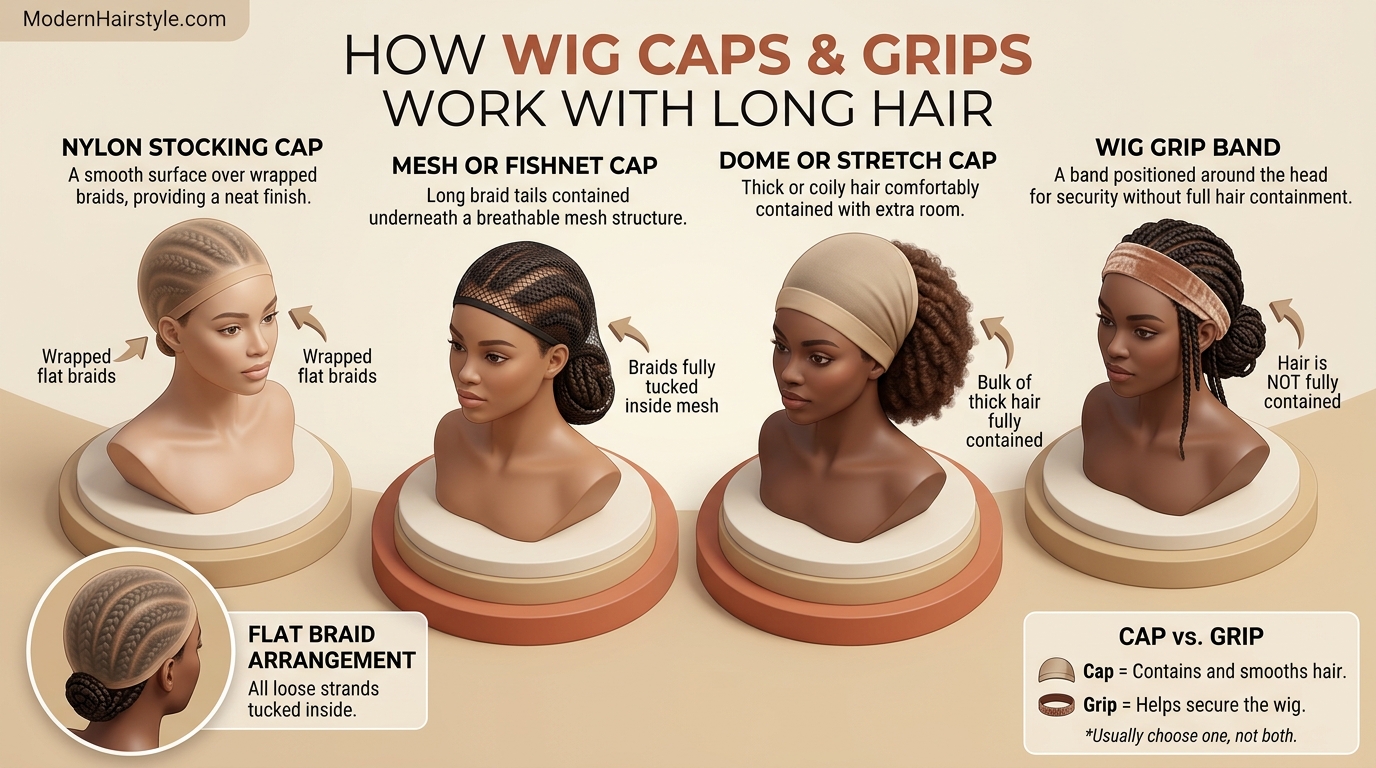
Frequently Asked Questions
Can you wear a wig if you have long hair?
Yes, and people do it every day. Braid, cornrow or pin curl your hair flat, contain it in a cap or grip, then verify flatness before styling the wig.
Do you have to cut your hair to wear a wig?
No. No method on this page needs a cut, because length is managed by distribution, not removal. Anyone who tells you a trim is required is selling a shortcut, not a necessity.
What is the best method for long hair under a wig?
It depends on thickness and target wig. Two wrapped braids suit most medium hair, cornrows suit thick or long hair, and pin curls give the flattest base for short target wigs.
How do you flatten long hair under a wig?
Distribute it into flat braids, cornrows, flat twists or pin curls. Cross or wrap the tails at the nape, pin everything flat, cover with a cap, and run the palm sweep test.
Should I braid or bun my hair under a wig?
Braids are the safer default for long hair. A flat low bun is a labelled strand: one guide allows it, another warns it lumps, so let your flatness test decide for your hair.
How many braids do I need under a wig?
Use two sections for most hair and four when your hair is thick. That two versus four split is a thickness rule, shared by several cap and wig retailers in their guidance.
Are cornrows better than braids under a wig?
Cornrows lie closer to the scalp and handle thick, long or coily hair well. Loose braids are faster and easier for beginners with fine to medium hair, so choose by hair, not fashion.
What are pin curls under a wig?
Hair is wound into small flat curls and pinned close to the scalp. Theatre and cosplay use pin curls for the sleekest, flattest base, at the cost of more time and more pins.
Can I use a low ponytail under a wig?
Only with fine hair, folded low and flat, and only if it passes the flatness test. In thicker hair, a folded ponytail is a common crown lump waiting to be diagnosed.
Are Dutch braids good under a wig?
Use them with caution. Dutch braids sit raised on top of the hair, which adds profile and bulk, so French, standard and cornrow braiding lie flatter under a wig for most wearers.
Do I need a wig cap if I have long hair?
A cap is the default, because it contains every strand and smooths the base. A wig grip band is a real alternative, and most wearers use a cap or a grip, not both.
Which wig cap is best for long hair?
Mesh or fishnet caps handle long tails well and run cooler, nylon gives a smoother finish, and dome or stretch caps give thick hair more room. Match the cap color to your skin tone.
Which way do you put on a wig cap, front first or back first?
It is a labelled strand: one established method works nape to forehead, another forehead to nape. Pick one, keep the cap edge flat, and the direction itself will not change your result.
How do I tuck long hair into a wig cap?
Cross braid tails at the nape, pin them in a circle or flat path, then bring the cap over the pinned hair. Tuck every loose strand, especially at the hairline and nape.
Why does my wig look lumpy?
Bulk is stacked in one zone, usually a crown bun, a folded ponytail or tails pinned to one side. Use the lump diagnosis table: locate the zone, name the cause, then redistribute.
Why does my wig sit too high?
Crown zone bulk is the usual cause, or a cap that is too small over your prepared hair. Flatten the crown first, then check straps and cap size over the finished prep.
Why does the nape of my wig ride up?
Unpinned or thick tails are collecting at the nape. Wrap the tails flat along the nape, pin them securely, and consider a mesh cap when your tails are very long.
Why do my ear tabs float?
Side bulk, or a wig sitting too high, pushes the ear tabs outward. Flatten the side braids, reseat the wig at your natural hairline, and recheck the crown zone for hidden height.
How do I stop my wig slipping over long hair?
Contain every strand, use a cap or a grip band, and set straps snug, never tight. Loose hair at the perimeter breaks the grip, so check the edges before blaming the wig.
Should I measure my head before or after braiding?
Measure after braiding, over the finished base, because that is the head the wig must fit. A labelled fitting strand puts an average cap at 22 to 22.5 inches, before your prep is added.
What if my wig is too small over my braids?
Let the adjustable straps out first, then try a stretch or mesh cap, then a larger cap size. Never force a tight cap, because tight at the hairline is a warning sign, not a fit.
How tight should braids be under a wig?
Snug, never tight. Headache, pulling or pain at the hairline means loosen or remove the style, and repeated tight installs stress the hairline over time, so treat comfort as a hard limit.
Can wearing a wig damage long hair?
As general information only, risk comes from tight braiding, friction, damp hair under a cap and never taking breaks. Flat snug braids, dry hair, clean caps and rest days reduce those risks.
Should hair be dry before putting on a wig cap?
Yes, fully dry. Competitor guidance links capping damp hair with mildew and irritation risk, so the safe habit is clean, fully dry hair under a clean, dry cap, every single install.
How do I prepare coily hair for a wig?
Detangle gently, moisturize well, then cornrow or flat twist straight back with even, snug tension. Coily, dense hair usually needs the cornrow route rather than loose braids to sit truly flat.
How do I wear a short wig with long hair?
Use the flattest methods: cornrows or pin curls, tails fully distributed, a mesh cap and a strict flatness test. A short wig forgives no bulk, so skip buns and folded ponytails entirely.
How do I wear a bob wig with waist length hair?
Cornrow the hair or use four flat braids, wrap the tails in a flat circle and pin every tail. Choose a mesh cap, measure over prep, and verify the nape zone twice.
Can I wear a wig with long hair without a cap?
Some wearers use a grip band alone, successfully. Your hair must still be braided flat with every strand controlled, or loose hair will break the grip and show at the edges.
How long does it take to put on a wig with long hair?
A labelled strand puts a first attempt at 20 to 30 minutes. With practice, simple methods take a few minutes, while cornrows and pin curls stay slower by design, so plan accordingly.
What tools do I need to wear a wig with long hair?
Bring a wide-tooth comb for detangling, a rat-tail comb for parting, flat bobby pins, soft hair ties and sectioning clips. Add a satin scarf for pressing, plus your cap or grip band.
What is the scarf press for?
After braiding, a satin scarf tied over the braids for 5 to 10 minutes presses flyaways flat before the cap. It is competitor guidance, labelled as such, and it costs you almost nothing.
Should I use gel or mousse under a wig?
Use it sparingly, if at all, to control edges and flyaways. Heavy product builds up under a cap, traps odor and shortens the time between washes for both hair and cap.
How do I hide braid ends under a wig?
Cross the tails at the nape, pin them flat in a circle or split them to both sides. Never stack all the ends in one place, because that stack becomes the lump.
Can I wear a wig every day with long hair?
Many people do, with flat protective braiding, clean caps and breaks between long wears. Watch your tension and hairline comfort, and give your hair regular rest days out of braids.
How do I keep long hair healthy under a wig?
Keep it clean and moisturized, braid snug rather than tight, and cap only dry hair. Wash your caps, rotate your methods, and schedule braid rest days as part of the routine.
What wig density works best over long hair?
A density close to your goal look, with layering, can mask a small residual bump. Treat density as a finishing tactic only, because distribution always comes first in the Bulk Map order.
Do glueless wigs work with long hair?
Yes, when the base is flat and the cap fits over your prep. Glueless security depends more on preparation and strap or band adjustment than on the label on the box.
How do I deal with baby hairs and edges under a cap?
Tuck every strand inside the cap edge and smooth your edges flat with your fingers. Check the perimeter zone in a mirror before the wig goes on, not after styling hides it.
What if hair keeps poking out at the nape?
Your tails are too loose, or too long for that cap style. Repin the tails flat, switch to a mesh or fishnet cap, and recheck the nape after the wig sit test.
Is a wig grip or a cap better for thick long hair?
Thick hair usually needs containment first, so a dome, stretch or mesh cap is the safer start. Try a grip only once the base is fully braided and completely controlled underneath.
How flat is flat enough for a wig?
Flat enough passes three checks: a palm sweeps the capped head with no ridge, the cap surface looks smooth, and the wig sits at the natural hairline with ear tabs flat.
What is the first thing to fix if my wig will not sit right?
Diagnose by zone before changing products. Crown height, perimeter show and nape riding each point to a different prep fix, and most fixes are redistribution, not a new wig purchase.
Conclusion
How to wear a wig with long hair well comes down to a simple order: distribute the bulk, flatten it, then verify it. Choose your method by your length, thickness and target wig, not by habit.
Start with the chooser and the Flatness Test on your next install, and fix lumps by zone instead of buying new products. The right cap or grip, fitted over your finished prep, does the rest.

Dilawar is a passionate writer and contributor at Modern Hairstyle (modernhaistyle.com), specializing in hairstyles, hair care, grooming, fashion, beauty, and lifestyle trends. He enjoys sharing practical tips, hairstyle inspiration, and easy-to-follow guides to help readers discover their personal style. His goal is to provide informative, engaging, and helpful content that keeps readers updated with the latest trends.